Last week I took a three-day workshop with Susan Moss on "The Creative Sketchbook." I've long been intrigued and also intimidated by the idea of a sketchbook practice. I've tried several times to work in sketchbooks, but have never been managed to persist. I knew Susan's work through her embroidered drawings, which I find deeply moving. When I saw she was offering a sketchbook workshop, I decided to give it a try and see what might happen. I was confident that the work itself over the three days would be interesting, fun, and challenging, and if it ended there, that was OK with me. But I am taking home with me more than the sketchbook and ideas for continued practice. I also found a renewed energy to put art-making central in my daily life, an idea for a new project, and an interest in trying out some new materials. Here are some images and descriptions of what we did.
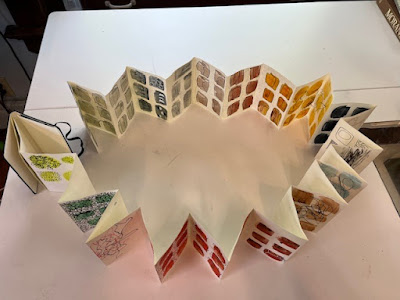
Susan provided a small Moleskin Japanese album sketchbook (accordion style, each page 3.5 x 5.5") for each participant. She also provided a huge array of paints, brushes, pencils, pens, charcoal, papers, etc. for us to work with; this was part of her encouragement to us to experiment--to try out new materials, marks, and methods. Experimentation was so much easier with the huge variety of materials that she made available to us. She also encouraged us to start out by painting color "swatches" on a number of pages in the sketchbook, using a wide brush and gouache paint. The swatches eliminate the dread of a totally clean page and the fear of what to put on it--just start by making some short brushstrokes on the page! And the swatches also give you a structure to work within/outside of, or not--it's also fine to ignore them while working over them. You can see an array of swatches across the sketchbook in this photo:
Susan provided a booklet of handouts that included prompts for drawings, prompts for reflective writing, and reflections on drawing and art in general by a variety of artists. She emphasized the importance of reflecting on what we were doing, and on our own histories of our relationship to art making. I probably spent about a third of the time writing, and two-thirds drawing.
And now some examples of the sketchbook pages. In the photo below, the four swatches on the left hand page were drawn on in response to the prompt: "Make a series of small, simple marks, filling/exploding some painted swatches." The column of three swatches on the right were done to this prompt: "Using your non-dominant hand, make some lines vertically or horizontally on painted swatches."
There had been earlier prompts to draw horizontal and vertical lines across swatches, varying pressure, density, spacing, and weight. With no hand specified, I of course I did those with my dominant (right) hand. I much prefer these lines done with my left hand! So much more intriguing, without the guidance of the purposeful right hand. (You can click on any image to enlarge it.)
Another set of prompts encouraged us to explore "the humble, magic pencil," varying the marks, and to also try smudging. I tried out ten of the many kinds of pencils Susan provided. My favorites were the Mitsubishi Uni 9B and the General Charcoal pencil. I also like the last line, where I drew with the blending stump that I had used to smudge the charcoal.
The prompt for this next sequence of three pages was to make a gesture with just a simple movement of your hand (I used a quick E-type shape), and then vary it in size/density. It was illuminating to see how much more interesting the drawing was in the densest version, on the right. I also liked the varying quality of the line I got using a
reed pen, a drawing tool I knew nothing about before this workshop; it's now on my Dick Blick shopping list. (One of the many nice things about living in Galesburg, Illinois is that it's the home of Dick Blick Art Supplies, and one of their stores is just 10 minutes from my house.)
The prompt for the middle panel below was to "draw your grocery list." I especially like the drawing of boy choy, one of my favorite vegetables. The column on the right was trying out a white gel pen along with black ink.
Here's another favorite--using the technique of a blind contour drawing (keeping your eye on the object being drawn, not looking down at the paper at all while you're drawing). The first drawing I did is on the right (on top of blue swatches). The prompt was to do a blind contour drawing of some objects close at hand on my table. This is a pair of scissors, resting on a glue stick, with a bull-dog clamp below it. I love how you can make a reasonable guess at what the objects are, but the quality of line is much more free and loose than you could do if moving the eye back and forth between the object and the drawing. The other drawings to the left are the same objects and method, but done with my non-dominant hand. No verisimilitude left here, but some very interesting lines that, again, I couldn't have drawn if I was trying.
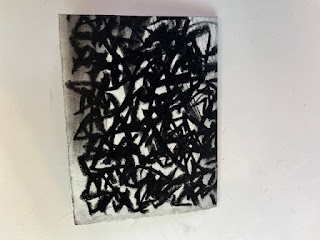
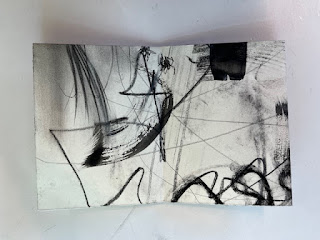
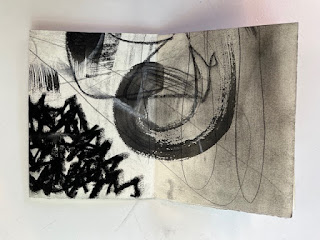
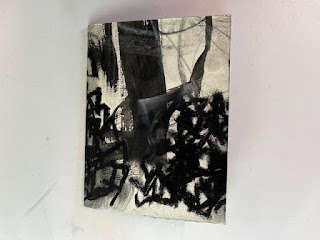
Another way to produce interesting lines and groups of lines by a combination of intent and chance: The prompt here was to make large gestures with black paint, ink, charcoal, etc. on a large piece of paper (18" x 24"), and then to have another person add something to what you did. I was the one who drew first on this piece of paper, including the strong vertical line and other brush strokes, the jagged marks done with a fat stick of charcoal at the bottom, and the smudges at left and right. The wiggly lines and the thinner pencil marks were made by another person in the class. Then the sheet was folded into a booklet, so that you see just one section at a time.
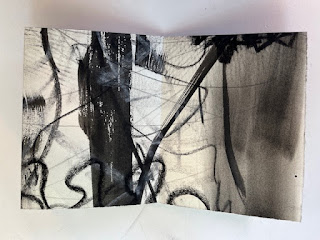
Here's the sequence of 8 pages that resulted from these unplanned crops. Susan encouraged us to look for a "story" in the sequence that unfolds.
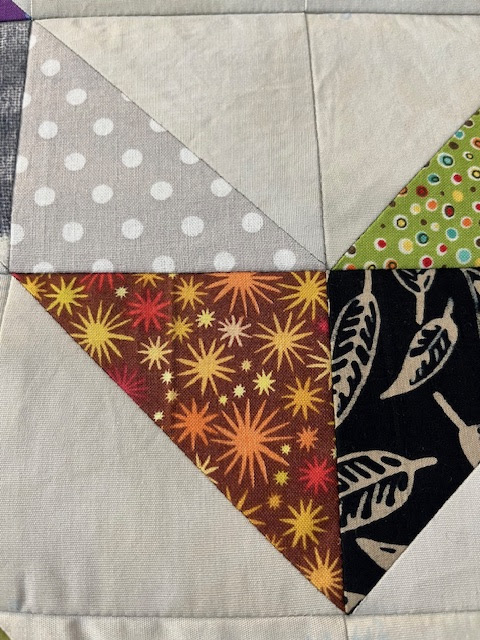
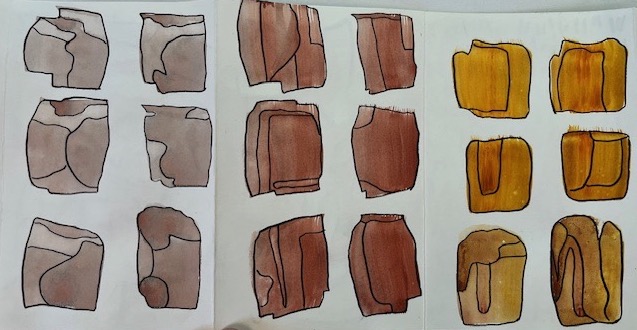
I've saved for last my favorite pages, which I've enlarged for better viewing. I had run out of steam towards the end of one day with doing the prompts provided by Susan and was just looking at a spread of lovely gray swatches in my open sketchbook. I picked up a marker and began outlining the swatches and the shapes within them, as formed by the changes in value as the paint dried on the page. I love so many of the shapes that emerged from this simple drawing gesture. And once again, I'm stunned by what can happen by mixing a lot of chance with a little bit of intention. That is, I was the person who made the gray swatches, purposely making some with two strokes, some with one, varying the pressure a bit, and not trying to even out the color across the swatch. So, a value variation as they dried was expected, but the shapes those took were entirely out of my control, and I wasn't thinking about it in any case. But then, looking later, my attention was caught by the variation, and I began tracing the lines, a pleasant activity, which then brought shapes forming before my eyes. These are shapes I could not have drawn on purpose. But it's also possible that now, having formed these shapes by accident, I can use them as inspiration to draw other shapes with intent/purpose--in the same family, perhaps, but different. I am eager to explore this further.
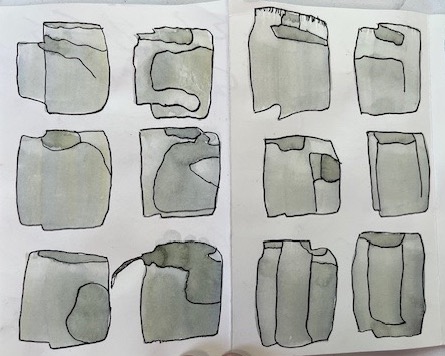
And here are a few other pages where I continued outlining found shapes. I had to hold myself back from doing nothing else for the remaining time we had!
So, many thanks to Susan Moss for a fantastic workshop, and also to my fellow students for their inspiring work. Susan gave us a scaffolding for our work (the format of the sketchbook, the prompts) that provided multiple starting points, while she also designed the workshop so that students were free to follow their own ideas, inclinations, and styles. She insisted that we look in the work for what pleased us, and not to worry about anyone else. Even while she talked individually with each student over the course of the workshop, she did not go around the classroom systematically to give comments on individual work, and the writing exercises we did were explicitly for our own eyes only. At first this disturbed me, because I often work out my own thoughts in conversation with someone else looking at my work. But I came to see the importance of this tactic. It made me listen carefully to my own thoughts and feelings about the work and to proceed from there.