Showing posts with label improv. Show all posts

April 29, 2021

Project #2: Homage to Ellsworth Kelly, II

Back in 2013, I made a small quilt,  "Homage to Ellsworth Kelly," working from his paintings of colorful squares. You can see an example of one of Kelly's such paintings in the top row of the stamps put out not long ago by USPS--wish I had purchased more!

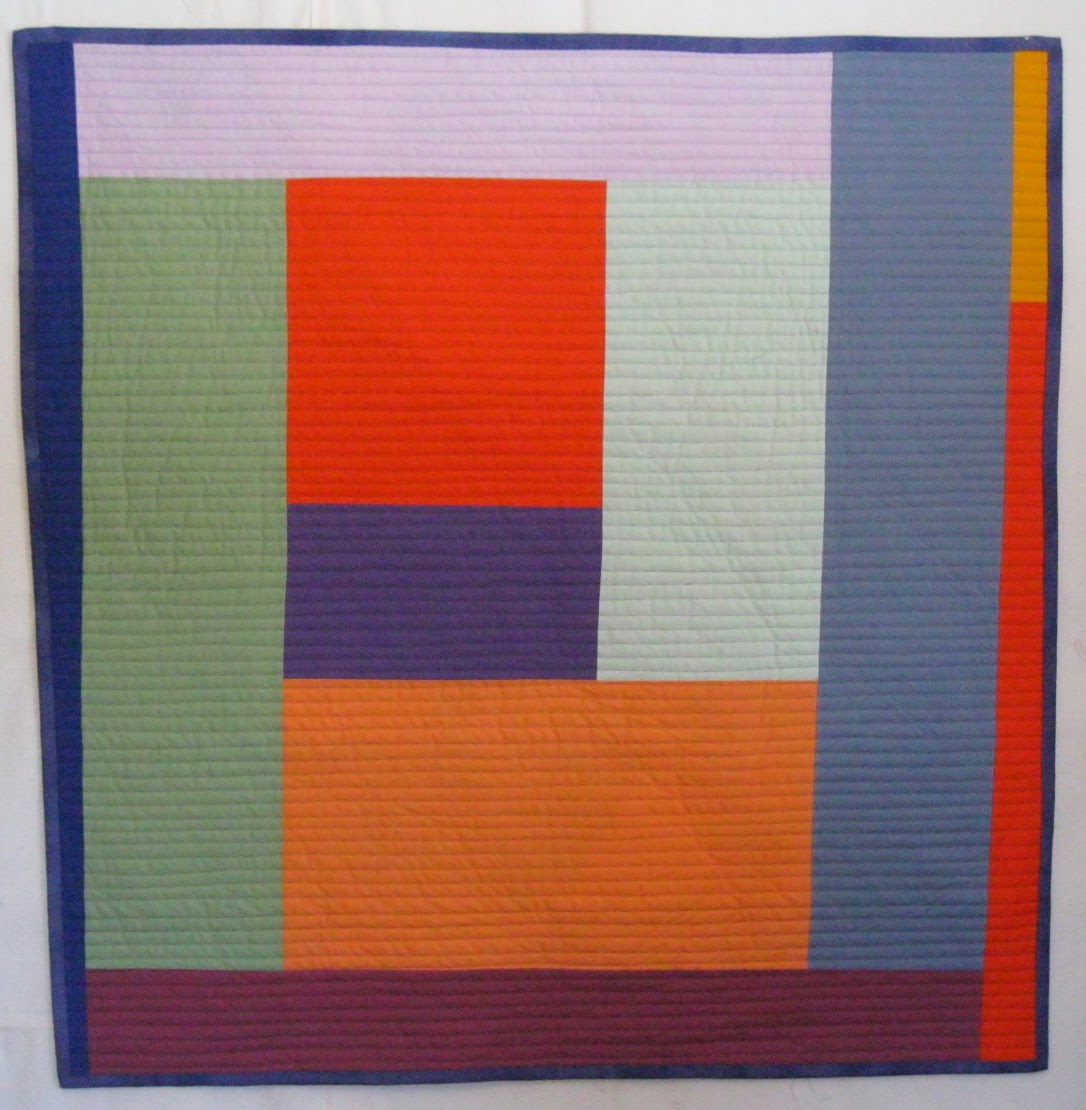
After studying a number of Kelly's paintings of squares, I decided to use multiple bright colors, along with both white and black, and to place the squares so that value contrasts dominate, but to also have some places where two adjacent squares are close in value. Here's the quilt I made, 36"x36."


For quite a while, I've had a photocopied image of another piece by Kelly on my bulletin board, "Brushstrokes Cut into Forty-Nine Squares and Arranged by Chance." 


Recently it occurred to me that I had on hand some fabric that might work well for a quilt based on this idea. I had dyed a couple of yards of cotton/linen blend in dark charcoal, but it came out less mottled than I wanted it, so had set it aside. I also had a large supply of the heavy natural linen that I used for Words Spoken. So I did some sample blocks with these fabrics, and decided to go forward with a large project. I'm making blocks that will finish at 7" square, and I'm planning on a queen-size quilt (91x112"), which will need 208 blocks. (In contrast, Kelly's entire piece is only 14" square, which surprised me--it seems large-scale to me, but instead it's small and delicate.)

The appeal to me of this kind of work is the combination of intent and chance. Kelly's original brushstrokes were made with some level of intent: making lines both thick and thin, curved and straight, and pulling the brush in long strokes across a page.  But then he cut the paper up into squares, with no attention to where in a line's path the cuts fell, and then he arranged the squares by chance. 

Kelly's piece is the starting point for my quilt, but my materials dictated a somewhat different method. Cutting and sewing in fabric strips makes for a different kind of line, and gestures made this way are not as free as a line made with a brush. And rather than making one large drawing and cutting it into 49 squares, the most I can do is work a strip that will be cut into two blocks. I've been doing that for about half the blocks, but if I want to include a pronounced curve, or some intersecting lines, then I work on just one block at a time, and do a more intentional composition. So, there's less randomness within the blocks than Kelly achieved. And although I initially put the blocks up on the wall randomly, as they are each completed, I do then step back and rearrange to get something that pleases me. This is a very enjoyable part of the process, seeing the different ways the lines can relate to each other. Did Kelly really arrange the squares totally randomly, without moving any squares? If so, what will power!

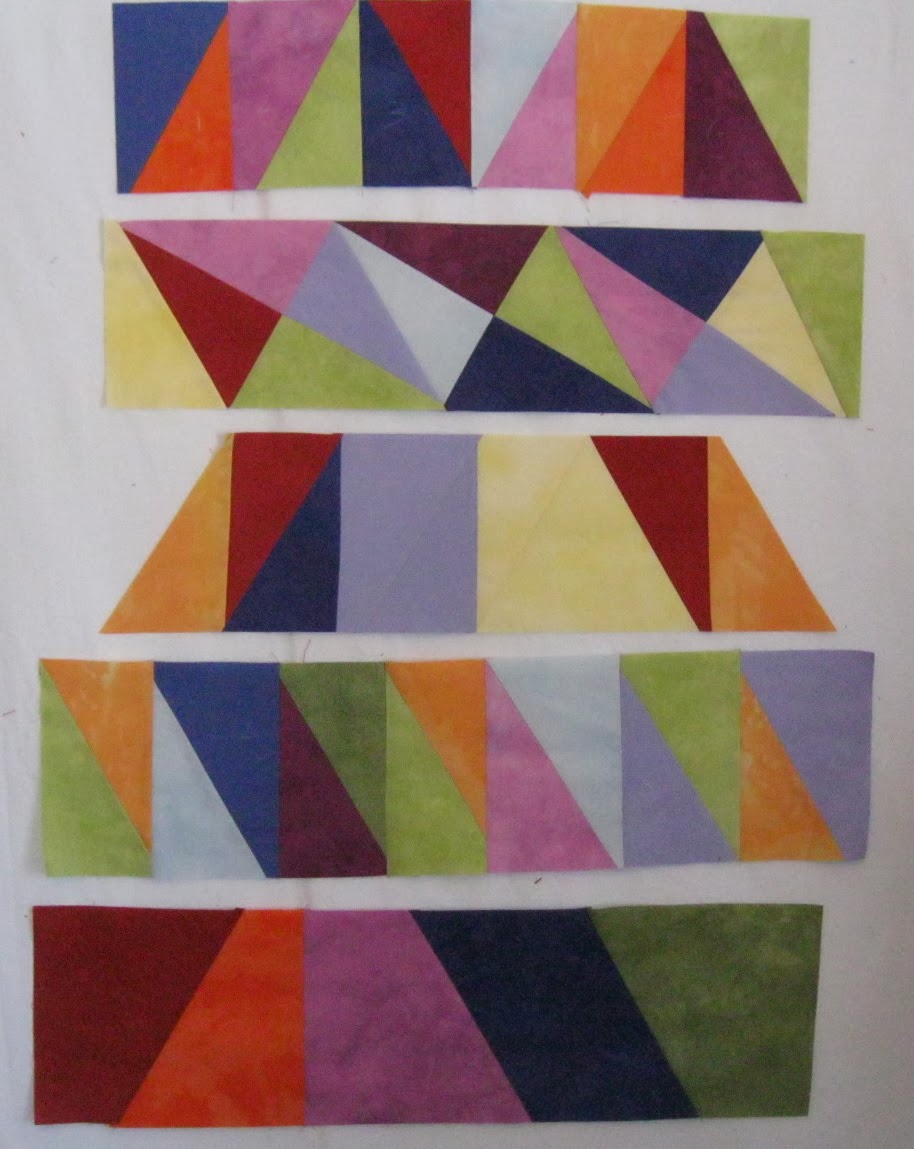
Once I made a few dozen blocks, I tried out different arrangements. The first is closest to Kelly's drawing:


Then I wondered what it would be like if I added in a few squares that flipped the black/tan relationship, and I like the result:


And then I wondered, what if I introduced more black still, isolating each of the blocks within a black grid:


I like this also, but the plan is to go with the second arrangement--some scattered black blocks, but no black sashing. Below is progress so far, with placement very provisional. The width will be as is; the length will go down past the bottom of the design wall, so I'll have to work on this in two sections. I've made several more blocks since this photo, so I'm now about 1/3 done. Some days I make a couple of blocks, some days as many as four. I'm taking it slow, enjoying watching the design in each block take shape. This is not a project conducive to production-line piecing.


Here's a close-up of part of one block, so you can see the texture of the linen. It's a loosely woven fabric, so I starch each block heavily before trimming it to size. (Click on the image if you'd like to see it larger.)


One other issue I've thought about: Are my two "Homage to Ellsworth Kelly" quilts too close to Kelly? Am I copying or making something new? Is it OK to make work this close to another artist's? A few thoughts:
  • Studying the work of other artists is a key part of learning to make art. Looking really closely at Kelly's, figuring out compositional elements that are central to the work, helps me understand key elements of composition such as color and line, and how to use them.
  • Copying the works exactly would likely have taught me even more, and art students are sometimes asked to do this as an exercise. But I was interested in making something that built on Kelly, while still developing into my own work. I have gone further in that direction in the second homage than the first.
  • If I ever do another exhibition of my work, I wouldn't include these quilts, given that they are derivative rather than more fully original. Not that anything is 100% "original," if you study at all the work of other artists, but there are degrees. 
  • To make my source clear, I have given both of these quilts the title of "Homage to Ellsworth Kelly," and I hope the recipients will enjoy looking at the work of the artist who inspired them, as well as the quilt.
And here's another, somewhat similar quilt that's a step further from being original work, a quilt that I made in 2015 from the "Glyphs" pattern by Modern Quilt Studio (issue 9 of their magazine). 


Being done from a pattern, much was decided by the authors of the pattern, although I did change the colors and sashing width and left off the borders. And while the pattern authors gave samples of "glyphs," they encouraged makers to create their own. Still, no mistaking that this is a quilt I made from a pattern created by someone else. 

Comparing the design of this with my second "Homage to Ellsworth Kelly" quilt: While there's much similarity in the construction, this quilt has straight lines only, and each block is a composition unto itself. The narrow sashing keeps each block distinct, so one doesn't get the feeling of connection that happens when there's no sashing, and when the lines include some curves.


May 25, 2019

Back in the studio

With prepping my studio for painting, putting it all back together again, and then a two-week trip to France, I was out of the studio for all of March and April. Once I got home, I spent a couple of weeks working on small projects, but then a week ago, I put Jeremy's wedding quilt blocks back up on the design wall, and have been working steadily on it since.  I start each day making a block and building up my supply of smaller units. It feels good to be working on it again, and I now have enough blocks up on the wall that I can get a sense of the overall impact.  I am happy with the direction it is taking.


The quilt will be about 60" wide (the width between the two strips of blue painter's tape on the design wall) and about 90" long (marked by the strip of tape on the heat register at bottom left). Right now I have 29 blocks, all cut to 10.5" high, but with varying widths. The blocks are not yet sewn together. I am thinking about placement as I put finished blocks on the wall, but there will be a good deal of adjustment once all the needed blocks are sewn.

I did complete one small top in early April, at a four-day retreat in Chicago with my friends in Quilters by Design:
42 x 42"

This started as a "travel appliqué" project, made with my hand-dyed fabric, and using the design of quarter-circles that I made in another quilt, described here (interesting to see how different the same design can look with different fabrics). For a year or two, I carried around gray squares with basted circles. When they were done, I cut them in quarters and sewed them back together. I chose colors based on my bedroom--this may end up as a wall-hanging for that room.

And here's an account of the small projects I completed after I got home from France:

First up, I spent time designing and basting a new travel appliqué project. I like to have appliqué to do as handwork with me when I travel, but there are requirements: it has to be relatively small, and it has to be working with complete single shapes, not layering one shape on another. I had such a project with me in France, but it was something I had done before--a repeat of a Japanese crest design. It happened to be a relatively challenging piece (many very narrow pieces), and that, along with the fact that it was something I'd already done, added up to a not very enjoyable project.  When I got home, I actually threw it out, about 1/3 completed. I was highly motivated to have another project lined up before my next trip, whenever that may be.  I decided to something along the lines of this quilt, done about 10 years ago from a purchased pattern:


I decided to go with just rows of applique, no striped borders. I sketched out a design in Photoshop, experimenting with shapes and colors, and figuring out the dimensions


I kept the dimensions as designed, including placement of narrower rows, but did further fiddling with shapes and colors. The shapes are now all basted onto rows of yellow fabric. This way, I can take a couple of rows of fabric with me on a trip. I'll sew the rows together once the appliqué is done. 

will finish at 36 x 42"

Hmm, looking at this photo, I think I may need to un-baste the orange triangles and place them a little further apart.

Next I finished up a small "structured improv" quilt that I started at the quilting retreat, using an improv method that Jill Guffy taught to us.
36 x 42"
Then I finished a round table mat for my sister, to go with some placemats I made for her last year; it just needed trimming and binding.

diameter 29"

And then I spent a few days making a large supply of luggage tags--a fun way to use up small pieces of fabric in my stash. I like to have a supply of these on hand, and I had just given away my last one. Usually I make about 10 at a time, but it always takes me a while to warm up and remember how to make them efficiently, so I figured I would just keep going, and I ended up with close to 4 dozen.

17 different fabrics

44 tags total
And soon after my return, I sandwiched up the half-circle applique project (including dyeing some gray fabric for the backing) and started hand-quilting it. Right now I'm doing a grid of ditch-quilting in the seams, and will likely add additional lines of quilting in two directions in the middle of each small square. Each day after breakfast, I do about 20 minutes of hand-stitching, before going up to the studio. Soon it will be nice enough to do this outside on our back deck--it just has to stop raining. . .


February 5, 2019

One block at a time


I'm thinking of working on no more than one block a day, so that I don't get frustrated with the process of working on these blocks. Even though it may look like random improvisational piecing, I learned when making the first "confetti" quilt that each block is a composition in itself, which then needs to find its spot within a larger composition. It's a challenging process, with a fair amount of ripping and restarts along the way. The block above is what I finished this morning. So now I have these two blocks:


The block on the right is two sections seamed together vertically (just to the right of the turquoise bit). This may or may not stay this way--I hadn't noticed the secondary "lightning" pattern of the lighter blue in the background. Perhaps it will work, perhaps not.  I can see that I need to approach this project with both curiosity and patience.

December 5, 2018

Using the last bits


I had stamped several bowls on white linen instead of natural, and decided to make a few cards from them, no stitching added. These needed a black or gray background instead of cream.

Then I did some improvisational work, using the scraps generated from trimming the abstract compositions shown in the last post. This piece is about 6x11 inches.


I enjoyed working on this, playing around with what can be made from a variety of related shapes. The fact that the bowl shape includes both straight and curved lines makes for interest in the cropped forms. I think I will leave this as is, without trimming the edges further.

I only have a few small scraps left. Not much variation of mark/texture in what's left, so I'll stop here.


December 24, 2016

"Confetti"--a wedding quilt


It has been many months since I've made a quilt.  I finished piecing "Holiness" in March, 2016, and then worked on a couple of other pieces about stones until deciding in June that the series was complete with Holiness.  The next couple of months were spent preparing for my August exhibition (with a side-trip to a workshop with Paula Kovarik).  I spent September preparing for a print-making workshop with Clare Benn in October.  For a few weeks after the workshop, I did follow-up work from that, lining up elements of the cloth napkins I'd like to be making.  But I really missed sewing, so I interrupted the napkin-making to come back to a quilt I had started in the spring, a wedding gift for friends.  The inspiration for this quilt was one by Cecilia Koppman:

La Torre de Babel (The Tower of Babel) by Cecilia Koppman
I liked the neutral background and the splashes of color.  I saw a photo first, and only later the title of the quilt.  Not so appropriate for a wedding image. . .  I focused my design on the idea of confetti instead, which meant that the bits of color were all angular bits, no bars.  I changed the background to beige/tan, because that worked well in my friends' living room.  And though I wasn't sure if an image of throwing confetti would be denser at the top or the bottom, I've ended up with the dense part at the top.

Below is a photo of the work in progress.  I improvised blocks in various sizes, and then added and combined until I got a block that was 10.5" high, with varying widths.  I played around with placement of the blocks, ending up with seven rows.  As always with improvisation, the early steps were playful fun, and the latter part--when one has to move from randomness to considered composition--an interesting challenge.


For the quilting, I decided to use some of what I had learned in my summer workshop with Paula Kovarik.  I gathered a set of quilting designs that would be in keeping with a theme of celebration.  I included some floral designs that are a reminder of the tissue-paper flowers that the bride taught me to make, and that I contributed to the wedding reception.  I used the shapes of fabric pieces as a guide to where to change designs, though I sometimes crossed borders between shapes. (You can double-click on photos to get a larger image.)


For the back of the quilt, I did a much simpler design, making four large "court-house steps" log-cabin blocks.  I was able to use up most of the background fabric I'd purchased, including some darker pieces that didn't make it into the front.  The back took me 2 days to piece, the front more like a couple of months.  


When making the binding, I included a few bits of "confetti."  Go back to the first photo to see how they look on the front (where they fit in better with the design).

Update, 12/26/16:  I was very interested to see the comments on this post.  Both Brenda Gael Smith and Beth Berman make a point about how the back conveys a different feeling from the front, Brenda commenting on the restfulness of perpendicular lines and Beth on the feeling of order and stability.  I didn't do this intentionally (I was just going for something that would relate to the front but be much simpler to piece), but I love it that this wedding gift ends up speaking to two different sides of marriage:  excitement and improvisation/spontaneity on one side, and peace/security/stability on the other side.  If there were a way to design the batting inside the quilt--unseen but also key to the structure of a quilt--perhaps it could represent the painful conflict that disrupts any marriage from time to time.

August 30, 2015

Kathleen Loomis' new book: Pattern-Free Quilts


I was the lucky winner of a copy of Kathleen Loomis' new book, Pattern-Free Quilts: Riffs on the Rail Fence Block.  I have long followed Loomis' blog, Art with a Needle, on which she usually writes about the sophisticated, challenging, stunning art quilts that she makes, and which have been shown in the top quilt/fiberart exhibitions such as Quilt National, Color Improvisations, and Quilts=Arts=Quilts. Her art quilts are distinguished by an intensity of design that requires a vast reservoir of persistence and commitment to carry off.  See, for example, her postage quilts, or her fine lines series.  But she also enjoys making simpler quilts.  As she explains:  "For almost 15 years, I have been working fulltime as a quilt artist.  I've made hundreds of quilts that have been exhibited throughout the United States and Europe.  But I still will make a baby quilt at the drop of a hat, and have a deep love for quilts of every style and use, whether they're made for show, for a living room wall or for somebody's bed" (p. 5).  I found it reassuring to know that this tremendously accomplished artist also enjoys quilting simpler things!

I have made many quilts without patterns, include a number based on the rail fence block,  but Loomis' book still has given me a lot to think about.  The book opens with a thoughtful discussion of why one would want to make a quilt without starting with a pattern.  Her guiding advice is "Sew first, plan second."  A plan does develop, but in response to what one begins to sew.  Loomis doesn't explain why she uses the term "pattern-free" rather than "improvisational," and her method certainly has much in common with the improvisation strategies taught by Jean Wells, Gwen Marston, Sherri Lynn Woods, Jacquie Gehring, and others.  I would say that Loomis brings planning (even with no pattern) into the process sooner than most others, and she also focuses on building quilts out of blocks.  By focusing in the book on one type of block--rail fence--Loomis can play out a wide variety of ways of approaching a block, and she gives clear, detailed instructions for a number of variations.  I appreciated, for example, her instructions for three different ways to piece wedge-shaped or diagonal "rails" (pp. 50-53).

The book includes a gallery of about 25 quilts that use rail-fence in inspiring ways, from the simple to the complex.  Most of the quilts are by Loomis, but there are also a few by other artists (Terry Jarrard-Dimond, Zoe Willis, Norma Schlager, Kathleen Wilkins, Melinda Snyder).  I would definitely recommend this book to quilters at all levels.

May 11, 2015

Wild Geese: Improvisational quilting with Sherri Lynn Woods


I'm delighted to be a stop on the blog tour for Sherri Lynn Wood's new book, The Improv Handbook for Modern Quilters.  I was one of the quilters who volunteered to follow an improv "score" assigned by Sherri, so that she could illustrate the range of quilts that could result from the same underlying guidelines.  165 quilts were submitted and 22 accepted; I'm delighted that mine made it in!  In this post, I'll describe the process through which I came to the final composition, talk about what I learned through the process, review Sherri's book, and, last but not least, offer a giveaway of the book to a lucky reader.

The score that I was assigned is called "Modern Block Improv."  The basic idea of this score is to take a traditional block--here Flying Geese--and to work with it improvisationally.   My finished quilt: 
"Wild Geese" (38 x 40")

I had taken a class from Sherri at QuiltCon in 2013, and the class had focused on the same idea of starting from a traditional block.  In that case, we had been asked to come to the class having chosen a block that we wanted to work with.  I had chosen "Rail Fence," and really enjoyed the process of discovering totally new directions from the focused improvisation.  You can see posts on the workshop and later work based on that here, here, and here.

For the flying geese project, I began by trying out a number of variations on the block.  I found doing improv with triangles quite a bit more challenging than the rectangles I'd used before (in working with Rail Fence, and also Log Cabin)--but that also meant some interesting surprises.  The photo below shows the earliest versions at the top (two normal flying geese blocks, but cut by eye rather than by measuring), and the later versions below that.  I was glad I tried out a variation with curved "triangles," but they didn't end up in the quilt.  One side effect of improv piecing--quite a few experimental blocks end up in the scrap bin.


After I had a stock of blocks, I played around with juxtaposing them.  Really interesting shapes can develop.


I find making the array of blocks, trying out one thing after another, to be a very playful activity; the really hard work comes when trying to put the blocks together into a composition.  Without a set pattern to follow, there are so many possibilities.  I found it important to continually and consciously keep design principles in mind as I moved the blocks around the design wall--e.g., line, shape, color, balance, asymmetry.  (Value and texture didn't come into play here, because of my decision early on to use only red and white.)


The traditional flying geese block lends itself to be organized in rows, either in a border or in the whole quilt.  I wanted to reference that traditional layout in my quilt, but not to make it the central design feature.  In this first pass at making a composition, I put a row of traditional blocks in a column on the left side of the quilt, and some version of that stayed through to the end.


It bothered me that I could see a cat's face in the composition:  two white ears and a chin.  Improved by taking out the "chin" and simplifying the center of the quilt:


Better yet--I like the addition of more red, including reversing the colors of the flying geese blocks in the bottom left:


The version above was sandwiched, and I was about to start the quilting the finished top.  But the two large vertical triangles that had previously bothered me as "ears," now bothered me as "mountains."  The human mind sometimes fights against abstraction!  Rather than undo a lot of the piecing and trying to insert new sections, I decided to use applique to change that area of the design by sewing other pieces of fabric over the composition.  It worked--once the quilt was quilted, even I can't find the spots that were appliqued unless I compare the photos.  The final composition:


Deciding on the quilting was another challenge.  I wanted to quilt white on white and red on red, which meant a lot of starting and stopping as I sewed.  I also wanted to change quilting designs in the various areas of the quilt.  I tried out a number of designs with pencil and paper, many of which were included in the quilt:


I love how the back of the quilt has it's own design, as a result of the red quilting showing through on the white back:


I definitely recommend Sherri Lynn Wood's book to anyone who is interested in improvisational quilting, either trying it out for the first time, or looking to extend the ways in which you already use improvisation.  Take a "look inside" on its Amazon to see the table of contents and sample pages.  One of the main sections of the book are the ten quilt Scores, which will guide you through a variety of strategies for improvisation, and another main section is on "Patchwork Techniques" that are used in one or more of the scores, techniques that are helpful no matter how you incorporate improvisation into your quilting.  I'm looking forward to trying out more of the scores, starting with Patchwork Doodle, Layered Curve, and Showing Up.


September 5, 2014

Variations on a theme

(Note to Quilters by Design folks--If you'd rather be surprised by your block in March, go no further!)


I tend to work on multiple things at once, which means that the story of a particular project can be spread out over months, sometimes years.  The blocks above are the final result of the challenge I posted about in May, using the fabrics that I posted about the next day.  The basic idea:  each of nine quilters chose one or more colors.  As one of the nine, I made eight compositions, one for each of the other quilters, using their preferred colors.  (One person chose "pastel floral" instead of a specific color, which explains why the block in the middle of the left column looks quite different.)  The only size specified was that either the width or length had to be 9.5 inches.  I decided to start each of the designs with the improvised shape that I came up with in a class with Sherri Wood (described here):


I continue to like this basic shape, even after playing with it eight times for these challenge blocks.  

We'll be exchanging our blocks at our next retreat in March.  It will be fun to see what others made for me.  I gave just one color for my preference:  yellow-green.

April 4, 2014

Quilt accepted in a publication


I got the happy news recently that a quilt of mine has been accepted into a forthcoming book by Sherri Lynn Wood, The Improv Handbook for Modern Quilters.  Sherri solicited quilts from volunteers, who were assigned one or another improvisational quilt "score" set by Sherri.  Even though I've done quite a bit of improvisational work before, I learned a lot in the process of making this quilt, and I look forward to sharing more about it, including photos, once the book is published in winter/spring 2015.  (Until then, contributors are legally bound not to share any photos online.)

* * * * *
To give you a photo of something, though, here's the fabric I've just cut for a small project--a runner to put on the top of the buffet in my dining room.


This is a selection of Japanese daiwabo fabric, quite different from what I usually work with, but it is such lovely material.  Here's another view of the fabrics, uncut:


Several years ago, I bought a dozen pieces of daiwabo at a quilt show, and made a few placemats from them.  I really like the subtle variations in texture and color.   Here's one of the placemats:


March 27, 2014

Expanding a palette


A recent project demonstrated clearly to me how expanding a palette can make a more interesting quilt.  I recently got a ruler that makes it easy to cut isoceles triangles, and wanted to make a quilt with just the one shape.  I opened my drawer of hand-dyed fabrics, and picked out a few colors I had done this summer and was really happy with the limited palette I pulled--mauves, lavender, blues, and greens. 

 My first layout:


I liked these colors, but they seemed a little boring. 

I tried adding in light blue to get larger range of values:


Then I added black and cream:


I took out the black and cream, and added in yellow and orange--better!


Finished front of quilt:


Cutting the triangles left me with a lot of beautiful scraps.  I pieced them together together, intending to use them for the back of the quilt:


After adding in some additional large pieces of my hand-dyed fabric, I decided this deserved to be the front of another quilt.  


For the outer edge, I used a "faux-piped binding technique:


I made two "chunky log cabins" to be the backs for the two quilts.  I enjoyed making these, working with the large supply of commercial solids that I have in my stash.  But in making backs larger than the fronts (as one does to help in the sandwiching/quilting process), I didn't take well enough into account the finished size of the back.  Top and bottom edges are fine, but the intention was to have wider pieces on the right and left sides of both backs: