August 13, 2020

Catching up: Embroidery


Back in the spring, I started sewing small embroidery motifs on linen. The idea came from a blog post by Mary Corbet that featured a small tulip design. (More on Mary at the end of the post). I found more ideas for motifs, in a couple of books on hand that I used as sources for the motifs: Yumiko Higuchi, Zakka Embroidery and The New Anchor Book of Free-Style Embroidery StitchesI loved stitching one or two of these each morning.  I fringed the edges of each small rectangle (about 3"), and then secured them to Fabriano Medioevalis note cards with fusible web tape. (I tried a few different fusibles; this one by Singer worked best.) I like having a stock of cards that incorporate a home-made element.  Here are a few more of my favorites:


Also this spring, I started to work on a crewel embroidery kit that I had planned to bring with me for a month-long stay in the Seattle area. Of course travel plans were cancelled, but I was curious to try out the kit. The photo below shows the printed pattern on the right side, my stitching on the left.


(The design is by Carolyn Barrani, www.tapistree.com.) 

This turned out to be a very good project to do in the midst of the uncertainties and anxieties of the pandemic. All the different stitches and colors are specified, and the yarn is provided in the kit. I didn't have to make any decisions. I worked on one section of a flower at a time, following the directions, enjoying the colors and seeing what came to be. A number of the stitches were ones I had never done before, including some I never would have tried if I'd just seen the directions in a stitch encyclopedia. It gave me a sense of accomplishment to master the bullion knot and shadow box laid stitch! You can see bullion knots below--the coiled up stitches in the middle of the petals done with a yellow buttonhole stitch. And I love the rose and burgundy color buds in the upper right, made with a whipped spider web stitch. 


The center of the sunflower below is done with the shadow box laid stitch:


One more detail:


Here's the finished piece, which I'm thinking I will back with another piece of linen and use as a cover for challah.


About Mary Corbet and her website: https://www.needlenthread.com/ Most of the blogs I follow are about quilting and textiles, with a few on stitching as well. The ones on stitching are mostly about free-form stitching done on quilts, but somewhere along the line I found Mary Corbet's embroidery blog, an extraordinary resource for anyone the least bit interested in embroidery. Her posts usually include photos of beautiful designs she's working on, and the blog is worth looking at just for the photos; here's a sample. But there's so much more. Mary is a superb writer, and every post is an occasion for teaching one thing or another. I just like listening to her "voice." Very down to earth and encouraging. She has things for beginners and for the most advanced stitchers. And the blog is only the top-most surface. Her web site has a huge number of tutorials, both on specific stitches and all kinds of other tips. It includes a large range of downloadable designs (many for free), and there is also a shop for purchasing items. There is a robust search function, which I have used extensively. (The only odd thing about the search: the first items on the list come from other places on the web, but if you scroll down past the first four entries, you'll come to a full list of entries from Mary's site, needlenthread.com.)

One of my favorite recent posts of Mary's was on the subject of ripping out work done.  I know this issue well; all quilters have a seam ripper close at hand. But one tends to feel one has failed when something major needs to be undone.  Mary has a different take on it: "There is always something satisfactory in picking out faulty embroidery stitches. I know, I know!! We tend to think that 'frogging' (rip-it, rip-it) is a horrid hassle, and to go through it is a nightmare. But really, the satisfaction of knowing you're going to put something to rights and love your embroidery all over again makes picking out stitches a wondrous thing! It actually makes me happy when I get to this point -- when I've made the decision to pick the stuff out, and I can't turn back." What a great way to look this! I have often faced a fork in the road where I can either settle for work that is not accomplishing what I had in mind, or I can pick up the ripper and start again, using what I've learned from the earlier attempt(s). When working on a significant art piece, I think I can say that I've always had to rip and re-start, but it's often been with a sigh or groan, knowing I had to do it, but wishing I didn't have to. The next time I reach this point, I'm going to try to experience it with Mary's sense of wonder and happiness, with a sense of moving forward with the work rather than going backwards. Mary makes the point that even with a great deal of advance thinking and planning, you can't know what the work will look like until you actually do it.  When the work doesn't live up to the idea, then, no problem, just take it out, think some more, and try again. Repeat as needed.


August 2, 2020

Catching Up: Daiwabo--four projects completed

About a year ago, I posted about the large collection of daiwabo fabric that I was given by my friend Kathy.  I made a tablerunner for Kathy, and then cut out pieces for three additional quilts, two napping-size quilts and one wall hanging. I put them aside, to work on when I wanted to do some simple piecing.  One of them I pieced together at the annual retreat of Quilters by Design, the small group Kathy and I both belong to. The retreat was March 9-12. Within a day or two of returning home, the shutdown began. Amidst the disruption and anxiety caused by the pandemic, I found myself wanting to do some simple patchwork sewing, rather than doing the final work on Jeremy's wedding quilt. It was nice to have the daiwabo quilts, all ready to be pieced. Working on these gave me the break I needed before coming back to the wedding quilt.  The four projects:

Kathy's tablerunner (from September 2019
I can't find a photo of the whole tablerunner, but this gives an idea.


Half-square triangle napping quilt, 56x72"
I did diagonal straight-line quilting in both of these half-square triangle quilts,
which I think worked well. Click on photo to see detail.

Half-square triangle wall hanging, 36 x 36"

Zen Chic pattern, "Play a Card," 49 x 72"

This one still needs to be sandwiched and quilted.


July 13, 2020

Catching up: face masks

For most of the past year, I focused my blog posts on the making of Jeremy's wedding quilt. The last post where I talked about other projects was back in September, 2019. I've been working on several other things in these months, and every once in a while, I would title and save a blog post, to remind myself to come back and write about them; there are a half-dozen of these lined up. But I wanted to focus my attention on thinking through and working on the wedding quilt project, so I didn't write up blog posts about other things.  Since I finished that quilt, I've turned my attention to another big project, one I've been thinking about and making forays into since about 2006. I'm getting closer to having something to write about this, but not yet.  So, it's a good time to catch up on the other things I've been doing over the last year, mostly smaller craft work, but also a couple of art pieces.

I'll start with a recent craft project. Along with most everyone with a sewing machine, I've been making cloth face masks for a few months. 


I use a pattern given in the New York Times at the end of March. Soon after I started making them (in early April), the local natural foods store asked if I would be willing to supply them with masks, since people had been asking for them. I wasn't interested in making money on the masks, and I also didn't want to be spending more than a few hours a week sewing masks, so we came up with this idea:  I supply the store with about ten masks a week, at no cost. They have them on display, with a sign explaining that the masks are available in exchange for a donation to local food relief groups. Suggested donation is $10, but anything smaller is also happily accepted. So far, this has generated about $600 in donations. This definitely helps motivate me to keep making masks! I thought the masks might stop selling at this point, since they are now readily available in stores, but apparently not--people like the style, and they like that the money is going to a good cause.

Until recently, I made the masks with one layer of batik (recommended because of its tight fabric weave) and one layer of printed quilter's cotton, all from my stash of fabric. When I ran out of batik, I bought a couple of half-yards from a local shop. But rather than continue to buy fabric, I realized I could do some hand-dyeing on a bolt of fabric I rarely use, because it is so tightly woven that I can't hand-stitch into it (Testfabrics 419).  It's perfect for this use!  And it gives me the chance to do a fun kind of dyeing that I rarely use--mixing two or three different colors in a random pattern. (The dyeing I do for my quilts is almost all one-color solids or near-solids.) Below are six different strips I've dyed in the last couple of weeks. For any dyers reading, these are all with Procion MX dyes, color names noted on the photos. The "indigo" is a premixed dye from Dharma Trading; the rest are from Pro Chemical and Dye. For ease of use, I went with either primaries or pre-mixed colors. Now that I've got a method down, I'll probably mix some of my own colors, and extend the range. 


It's always fun to look up close at a smaller section of the fabric (click on photos to enlarge):


I took another photo with the four 13" panels placed right next to each other.  Hmm, something like this might be nice as a simple quilt top, maybe separated by narrow strips of solid fabric. . .


And here's the other side of the masks, showing the commercial cotton fabric I used:


May 4, 2020

Final post on "If Only: A Wedding Quilt for Jeremy"


If Only: A Wedding Quilt for Jeremy, 61 x 92", hand-dyed cotton
It's been two and a half months since my last post, where I reported on the decision I'd made about quilting Jeremy's wedding quilt. Since then, I went to the annual quilting retreat for Quilters by Design in the second week of March, just before everything closed in. I was able to show the quilting I'd done, and get thoughts on binding, so when I got home I was ready to finish the quilt. This included ripping out about half the quilting, as I hadn't pinned the layers carefully enough and there was rippling in the bottom half of the quilt.  In the photos below, the left shows a section of the bottom, with rippling, and the right shows a section higher in the quilt, which is smooth, as intended! I think you can see it was worth the work to re-do the quilting.


The next photo shows the back of the quilt. if you click on the photo, you can enlarge it, and you'll be able to see the very simple straight-stitch quilting I did in the ditch, across at each row, and then shorter vertical lines where I could stitch between blocks. From the front, you don't really see the quilting, which is how I wanted it. (The shadowy lines in the back are just the variation in color in the hand-dyed fabric.)


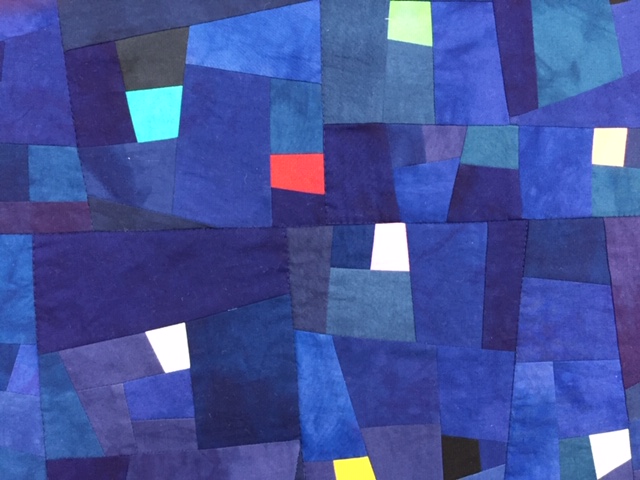
Another detail of the quilt, below. Almost all the small quadrilateral shapes are bright or light colors, but I did include a few black shapes. They needed to be in there too.


The quilt now hangs at the foot of the stairs, close to the front door (off to the left of the photo below).

For the last several years, "Shelter" has hung in that spot. We've now moved it around the corner to the den. The drawing to the left is by Mark Holmes. I like the conversation of the black shapes.


It is good to have both these quilts in places where we will see them every day; "Holiness" is also hung upstairs. It's part of keeping Jeremy with us. It's a comfort to have these and other physical reminders. The small things Jeremy made in wood and metal shop that are still in use. The tiny sapphire earrings that David and I both wear every day in his memory. An item or two of Jeremy's clothing that I wear. And of course, the extended process of making these quilts is itself a way of keeping him present in my life. Other quilts in the series stay put away in a suitcase, the quilts that center on pain, loss, guilt: Loss, Regret, Self-Portrait, Accident, Accident II. I am glad to have exhibited these quilts, but they are too painful to have on view at home.

* * * * * *

Some day I may do a spin-off of the wedding quilt.  Back in February, I had finished the top, and happened to hold it up in front of a window when I was folding it. The piece was beautiful with light coming through. I then pinned it onto a curtain rod, to see how it would look if hung that way.


We have some large windows in the house, and I was tempted to finish it to hang this way. But it wouldn't take long for light to fade and weaken the fabric, so I continued with the original plan to hang it on a wall. But maybe someday I'll make a smaller piece in the same style and wrap it around a frame that could be hung in a window from time to time.


* * * * * * *
Finally, for my own use (and yours if you'd like a look back), here's a list of posts about this quilt:

Feb. 17, 2020: Quilting decision made
January 25, 2020: Top completed
August 11, 2019: Editing the composition
May 25, 2019: Back in the studio
Feb. 16, 2019: Steady progress
Feb. 5, 2019: One block at a time
Feb. 4, 2019: A wedding quilt for Jeremy (describes the design process)


February 14, 2020

Quilting decision made


I've spent a few days doing trials of quilting, both machine and hand stitching, on both felt and 80/20 cotton/poly backing. Thanks much to Beth Berman, who reminded me about the possibility of felt, which I had ruled out because I thought I would end up with hand stitching. (I've used felt once before, where I was machine quilting and wanted it to be as flat as possible.) Beth reassured me that felt was easily workable for hand quilting as well.  

For the trials, I stitched in the ditch, in the horizontal seams that go across the width of the quilt. These rows are 10" apart.  Then I quilted vertical lines where blocks were seamed together. These are usually diagonal seams, and vary from about 4" to 12" apart. I'm a little wary about quilting this far apart (should usually be no more than 4-5" apart), but since I won't be using/washing this quilt (it will be a wall-hanging), this should be OK.  
  • The felt definitely kept a very flat look, more so than the batting.
  • Both hand-quilting and machine quilting on the felt kept a flat look.
  • The hand-quilting was very challenging, not because of the felt, but because there are many areas where multiple seams come together, and it was hard work to get the needle through these areas.
So, my decision is to machine quilt, with felt as the batting. I've ordered 108" wide Dream Cotton for the backing, some additional blue dye to dye it, and some felt for the batting. (For any dyers out there--the Dream Cotton dyes up very well, and doesn't need to be scoured.)

The photo at the top of the post shows a small area with some machine stitching visible (click on image to enlarge).  The photo below shows the larger area where the machine stitching has been completed--it's the area in the bottom right where there are no pins.  (Pinned area is not quilted at all.)  Comparing the quilted to the unquilted area, I am satisfied that the quilting doesn't interfere with the sense I wanted of an expansive, uninterrupted mix of blues. The quilting is not visible, which is what I wanted. Adding the felt gives a weight to the piece that is a good addition.  So, decision made and on the way to implementation!


One final decision remains to be made--whether or not to add a binding that would be a "frame" to the quilt (and if so, what color/s), or to do a faced binding, which is not visible from the front, and leaves the work unframed (like much of modern art). I'll make that decision once the quilting is done.

This is the first time I've done quilting trials on the quilt itself, rather than on a separate small sample. I needed to do it in this case, because the quilting was going to be on such a large scale, and the whole point of the trial was to see if the feeling of expansiveness could be maintained, for which I needed to quilt a large area.  Since I knew I would be taking out all the trial stitching, I basted on a light colored backing, to make it easier to pick out the stitches, and I also used a long stitch when doing the machine stitching (4.5 instead of 3.0). The long stitch worked well, so I think I'll keep that length when I do the actual quilting. 

January 25, 2020

Jeremy's wedding quilt--the top completed


detail of Jeremy's wedding quilt

I haven't posted for four months, since late September. At that point, I had taken a break from working on Jeremy's wedding quilt to prepare for a printing workshop, and after that, I was prepping hand-sewing projects to take with me on a camping/stitching trip to Utah. After the trip, I followed up on those projects for a while, only coming back to the wedding quilt in mid-December.  Even though I was working steadily on one project or another, I wanted to wait to write a blog post until I could report that the top of the wedding quilt was done. Since it's been a while, here's a link to my first post about the quilt, where I explain why I started the quilt and how I came up with the design.

Below is a photo of how it looked in its "rest period" between August and December. The note I've written in the middle indicates the row in which only a few of the colored bits are actually pieced in; most are just sitting on top of blue fabric, allowing me to play around with placement. All the blocks were still separate at this point--all of them 10.5" high, but of varying widths.


So, starting in mid-December, I worked steadily for a month, doing the final edits on the quilt. Here's an earlier post that explains the editing process. The process was very slow. The final blocks constructed were pieced through careful designing of the placement of each bit of color, no improvisation. Then various blocks in the quilt were subject to surgery, either cutting out bits of color to replace them with blue, or adding in bits of color. The flow of shapes/colors had to look random, without a straight line-up, or a regular arc. Then, when I pieced together the blocks in each row, things shifted a bit and more surgery ensued. I stopped at the point where nothing bothered me significantly. I think I could have gone on fiddling for another 3 months, but each time I changed one piece, it affected others, so I needed to bring it to a close. Below are two photos of the finished top, taken with different cameras at the same time of day. The actual depth of color is somewhere between them, closer to the one on the left, but the one on the right gives you a better view of the variety of blues in the quilt, and how the blue shapes also work in the design. 


-->
taken with my iPhone

taken with a Canon Powershot


The next photo (and also the close-up shot at the top of the post) gives a more accurate view of the blues. The top is laid flat on the floor so I could trim the edges; the strips of flooring are helpful in lining up a straight edge for a piece this large (62x90").  And using the floor had the useful side effect of my having to give the floor a thorough cleaning first.


I hope this photo also gives a sense of the attraction of the blue fabrics--they call out to be touched. I still have to decide whether or not to quilt this piece. I tried out some hand-quilting early in the process, and didn't like how the thread lines interfered with the smooth surface of the cloth. (I'd show a photo, but can't find the samples right now.) I also did a sample with machine quilting, as this would keep the blue surface flat rather than puffy (as can happen with hand quilting), photo below. To see the difference, you may need to click (or double-click) on the photo to enlarge it.

machine quilted at left, unquilted at right


Again, I prefer the undisturbed surface of the unquilted piece. I think I will try one more handquilted sample, working with a largish section of the actual top, rather than just one block, maybe using a thin, flat batting and a large grid for stitching. If I don't quilt the top, I'll simply face it with a plain fabric backing, and hang it that way.  This is intended as a wall piece, rather than a quilt to use.

I'm also thinking about what to call the quilt. As I've worked on it, I've thought of it as "Jeremy's wedding quilt" or "Confetti-2" (since the design idea came from an earlier quilt that I called Confetti). But I think the quilt needs its own name, and something a little more open-ended than "Jeremy's wedding quilt." Right now, I'm considering "If only."